
Ian Ethell Makes a Multi-axis Honey Dipper and Stand
27 September 2023
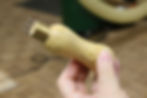


Ian began by telling us he is a member of the Trent Valley Turners and is still working full time. He was going to demonstrate a 9-axis honey dipper with stand.
He told it was a great exercise in precision turning and particularly in the use of the skew chisel. He distributed a diagram to show the various axes of turning he planned to use and the order in which they were used.
He was turning a rowan spindle 200mm by 30mm by 30mm. He was using this wood as his club had a plentiful supply of it, but that ash, cherry or beech would be as good.
He marked each end of the wood using a three-pronged marker which gave a central indentation and two indentations equally spaced on either side. These he marked as 1,2 and 3 relating them to his diagram to be the centres for his various axes.
Ian emphasised how useful the skew was in this project, but admitted a bowl gouge could achieve the same result. He used an oval 1-inch skew ground to a 15% angle. He usually turned at high speeds – perhaps 4000revs – but on the Club lathe he only felt safe with 1900revs.
The first axis he used was headstock position 3 to tailstock position 3 and in this position, he used his skew to make the concave section of the dipper handle first defining the limits of the section with his skew.
His second axis was headstock position 1 to tailstock position 1 to turn the inside of the handle with his bowl gouge which he finished with limited sanding trying to preserve the sharpness of the join between the outside and the inside of the handle.
The next step involved the piece being set in headstock 2 and tailstock position 2 – that is both central.
The head of the dipper was then marked out and shaped with a spindle gouge before the grooves were added with a parting tool.
The shaft of the dipper was then turned with the headstock in position 2 and the tailstock position 1. This created a narrow shaft and a certain amount of flex causing some chattering, again a very light touch was needed. The next 3 steps involve making 3 coves on 3 different axis – positions 2 to I, 3 to 1 and 1 to 3, the first number being the position on the headstock, the second number the position on the tailstock.
Ian again emphasised the importance of a very gentle touch and the preservation of the sharp edge transition between coves. Each was sanded lightly before moving onto the next step.
The final steps were to create an end to the handle with the headstock in position 2 and the tailstock in position 3, and the point of the dipper with the headstock in position 1 and the tailstock in position 2. This was done extremely gently, and the piece was removed from the lathe.
The two ends of the dipper were then tidied up with a small carving tool. The audience let out a collective sigh of relief before having their tea break!
Ian had already made the base of a stand – a strip of thin wood with a shallow hollow turned near one end. He turned the hollow on his much larger lathe in his workshop fastening the strip of wood to a flat headed chuck with double sided tape. He then turned a small flat section of wood into a stirrup shaped peg on which to rest the dipper. He turned the hollow on the peg as one would turn the centre of a solid piece of wood. It was very fine and delicate work. The peg was then fixed into a hole drilled in the base and the project was complete.
Report by Julian Birch